
I’ve always been drawn to Building a 15 meter dipole antenna as an amateur radio enthusiast. It’s a favorite among ham radio users for its reliability and efficiency on the 15 meter band. This guide will show you how to build your own 15 meter dipole antenna. You’ll learn the skills needed for a high-performing antenna for your radio station.
This guide is for both experienced hams and newcomers. It provides all the info you need to make a 15 meter dipole antenna. You’ll learn about the materials and how to put it together. By the end, you’ll have a reliable 15 meter dipole antenna for your radio.
What is a 15 Meter Dipole Antenna?
A 15 meter dipole antenna is made for the 15 meter amateur radio band. This band spans around 21 MHz. It’s loved by radio operators for its great signals and global reach.
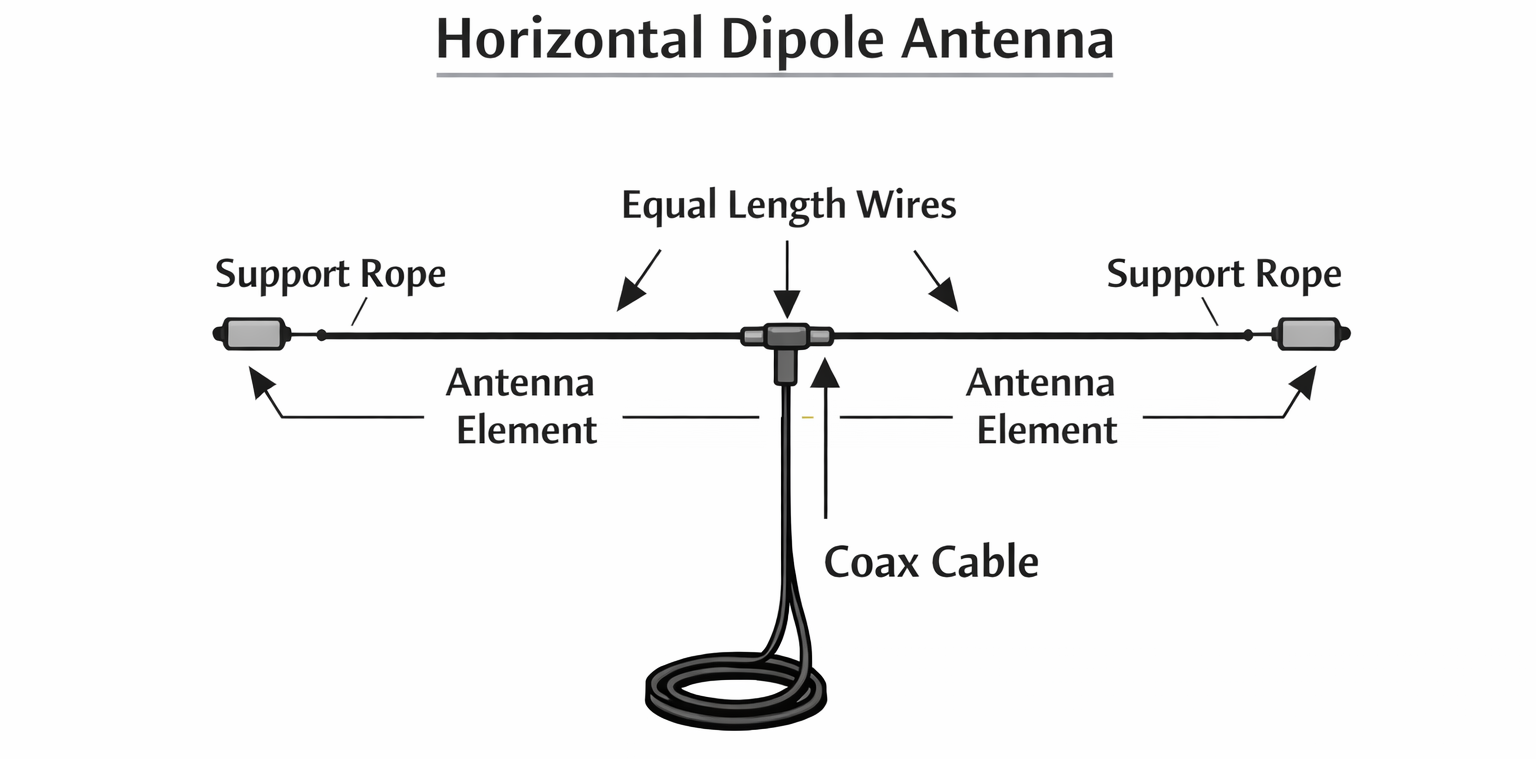
This antenna has two wire elements, each the same length, fed at the middle with a coaxial cable. It’s about half the wavelength of the 15 meter frequency, which is roughly 21 meters long.
This antenna design offers omnidirectional coverage. It sends out signals equally in all directions. This is great for radio fans who want to talk to many stations without needing complex antennas.
The 15 meter dipole antenna is easy to make with common materials. It’s a favorite for amateur radio antenna projects. Its simple design and affordable parts appeal to both new and seasoned radio users.
Next, we’ll look at the materials you’ll need, how to build it step by step, and tips for getting the best performance.
Calculating the Correct Dipole Length
A half-wave dipole length depends on frequency. The standard formula is:
Total length (feet) = 468 ÷ frequency in MHz
For the center of the 15 meter band (21.2 MHz):
468 ÷ 21.2 = 22.07 feet total
Each side of the dipole should be about:
11.03 feet per element
Or just Use our Dipole Antenna Calculator
Always cut slightly longer and trim during tuning.
WHAT TO ADD
15 Meter Dipole Cutting Lengths
| Frequency | Total Length | Each Side |
|---|---|---|
| 21.0 MHz | 22.29 ft | 11.14 ft |
| 21.2 MHz | 22.07 ft | 11.03 ft |
| 21.3 MHz | 21.97 ft | 10.98 ft |
| 21.45 MHz | 21.82 ft | 10.91 ft |
Choose the frequency you want best SWR.
Materials Needed for Building 15 Meter Dipole
To make a 15 meter dipole antenna, you need certain materials. Here’s what you’ll need for a ham radio antenna:
- Approximately 50 feet of 14 gauge wire, such as stranded copper wire, for the dipole elements.
- 2 end insulators, which can be made of ceramic or plastic, to support the wire at each end of the dipole.
- 1 center insulator or balun to connect the coaxial feed line to the dipole.
- Coaxial cable, like RG-8X or RG-58, to carry the signal from the radio to the antenna.
- A PL-259 coaxial connector to attach the coaxial cable to the center insulator.
- Miscellaneous hardware, such as cable ties and duct tape, to secure and support the antenna components.
The exact dimensions and specifications of these 15 meter dipole materials can be adjusted based on your desired performance and construction preferences. However, it’s essential to choose high-quality dipole antenna components to ensure the durability and efficiency of your ham radio antenna build.
| Item | Description | Quantity |
|---|---|---|
| Wire | 14 gauge stranded copper wire | 50 feet |
| End Insulators | Ceramic or plastic insulators | 2 |
| Center Insulator | Balun or other center insulator | 1 |
| Coaxial Cable | RG-8X or RG-58 | Length as needed |
| Coaxial Connector | PL-259 | 1 |
| Miscellaneous Hardware | Cable ties, duct tape, etc. | As needed |
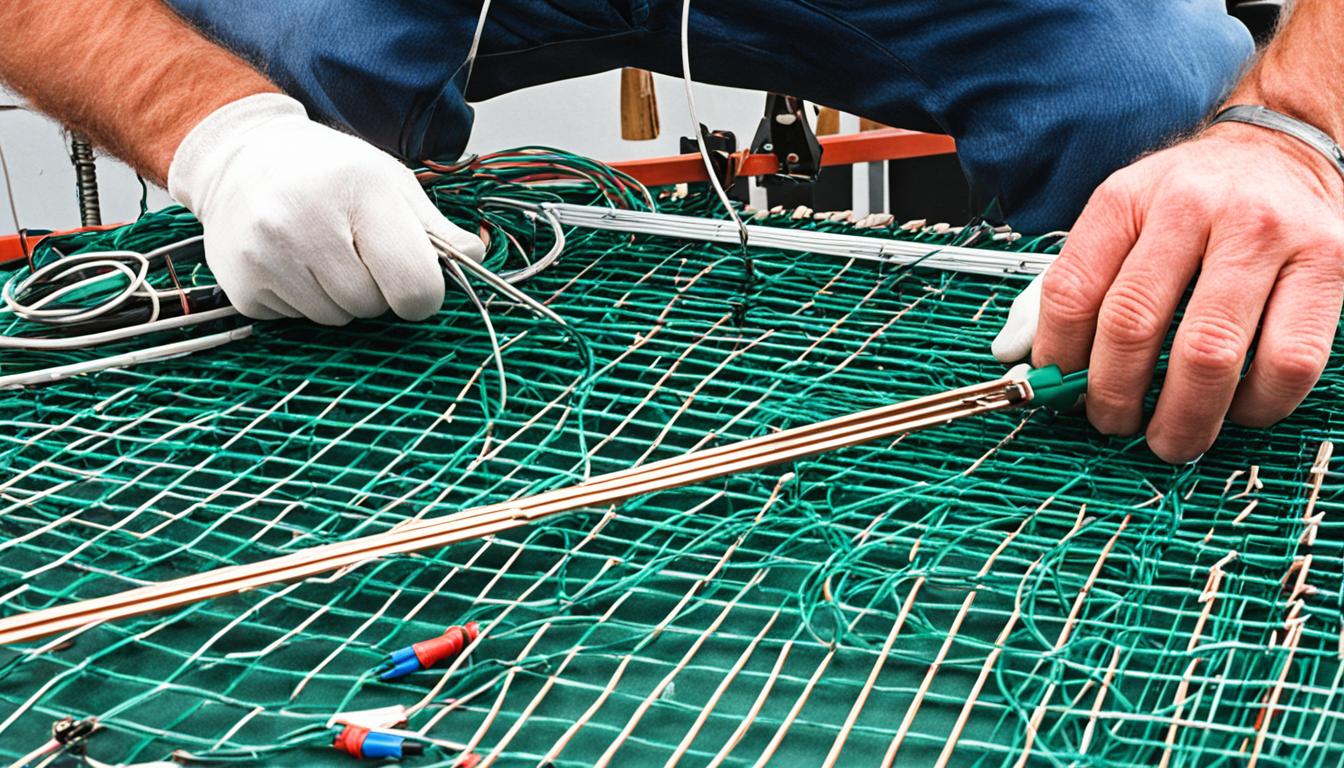
Step-by-Step Guide to Constructing the Antenna
Building a 15 meter dipole antenna is easy with basic DIY skills. Here are the simple steps to make this useful ham radio antenna.
- Start by cutting two equal 25-foot lengths of 14 gauge wire. These will serve as the dipole elements.
- Attach an end insulator to each wire end using a secure method, such as a bowline knot.
- Next, connect the center insulator or balun to the center of the wires.
- Attach the coaxial cable to the center insulator or balun, ensuring the shield is connected to one wire and the center conductor to the other.
- Secure the connections using cable ties, duct tape, or other methods to provide strain relief.
- Optionally, you can add a common-mode choke by wrapping the coaxial cable into a few turns near the center insulator.
Follow these easy steps to create a 15 meter dipole antenna ready for tuning and testing. Paying close attention to details is crucial for a successful ham radio antenna DIY project to get the best performance.
After building the antenna, it’s time to tune and test it. This ensures your 15 meter dipole antenna is working well and ready for your ham radio needs.
Feedpoint Impedance and Matching
A properly installed half-wave dipole typically has a feedpoint impedance near 70–73 ohms in free space. When installed closer to ground, impedance usually drops closer to 50 ohms, which matches standard coaxial cable well.
This is why many dipoles can be fed directly with coax without a tuner when cut correctly.
Tuning and Testing the 15 Meter Dipole
After making your 15 meter dipole antenna, it’s key to tune and test it. This ensures it works well. The steps for 15 meter dipole tuning and dipole antenna adjustment are vital for the best ham radio setup.
Start by using an antenna analyzer or SWR meter. This tool measures the SWR across the 15 meter band. If the SWR is high, trim the wire elements a bit. Aim for an SWR of 1.5:1 or lower for top performance.
Also, check how the antenna works by looking at its radiation pattern and impedance. This confirms the antenna is doing its job right. It should cover the 15 meter band well.
How to Tune a 15 Meter Dipole for Low SWR
Raise the antenna to operating height before tuning. Measure SWR across the band using an SWR meter or antenna analyzer.
If resonance is below the desired frequency, shorten both elements slightly. If resonance is above the desired frequency, lengthen the elements if possible.
Make small adjustments to both sides equally until minimum SWR occurs at the target frequency.
| Tuning Step | Adjustment | Desired Result |
|---|---|---|
| Measure SWR | Trim wire elements | SWR of 1.5:1 or lower |
| Check radiation pattern | Optimize element lengths | Desired coverage and performance |
| Verify impedance | Fine-tune element lengths | Matched to transceiver |
By tuning and testing your 15 meter dipole antenna well, you make sure it’s working great. This means it will perform its best for your ham radio fun.
Building 15 Meter Dipole
Building a 15 meter dipole antenna is a fun project for ham radio fans. It involves a few steps that, if done right, can make a great antenna for your 15 meter radio use.
To start, you need to cut the wire. Measure and cut two pieces of 14 gauge wire, each about 25 feet long. These will be the two parts of your 15 meter dipole construction.
Then, attach the end insulators to each wire end with a bowline knot. These insulators support the antenna and stop short circuits.
The center connection is very important. Put a center insulator or balun in the middle of the wires for a strong connection.
Last, connect the coaxial cable to the center insulator or balun. Make sure the shield is on one wire and the center conductor on the other. Use cable ties, duct tape, or other methods for strain relief.
After these steps, you’ll have a finished dipole antenna build ready for tuning and putting it up. Next, we’ll talk about tuning and testing your new 15 meter ham radio DIY antenna.
Erecting and Installing the Antenna
After building your 15 meter dipole antenna, it’s time to set it up right. Place it in an inverted-V shape, with the middle up high and the wires sloping down. This setup is key for the best performance.
Make sure the middle of the dipole is at least 30 feet off the ground. This lets the wires spread out more, improving signal strength. It also keeps the antenna stable and secure, stopping it from sagging or moving.
When setting up your dipole, aim it at the area you want to cover. This way, you’ll get the most out of your antenna and talk to other ham radio users clearly.
A horizontal dipole provides the most directional radiation broadside to the wire. An inverted-V configuration requires less space and often works well when only one high support is available.
The inverted-V typically has slightly lower feedpoint impedance and a somewhat more omnidirectional pattern, making it practical for general operation.

How Height Affects Performance
Dipole height strongly affects radiation angle and coverage distance.
Lower heights produce higher radiation angles, which favor regional communication. Higher installations produce lower takeoff angles that improve long-distance DX performance.
A common target height is:
½ wavelength above ground (about 23 feet for 15 meters)
Higher placement generally improves signal reach.
Getting your 15 meter dipole to work well depends on a good installation. Follow these tips to make sure your dipole antenna works great for your ham radio needs.
Radiation Pattern of a 15 Meter Dipole
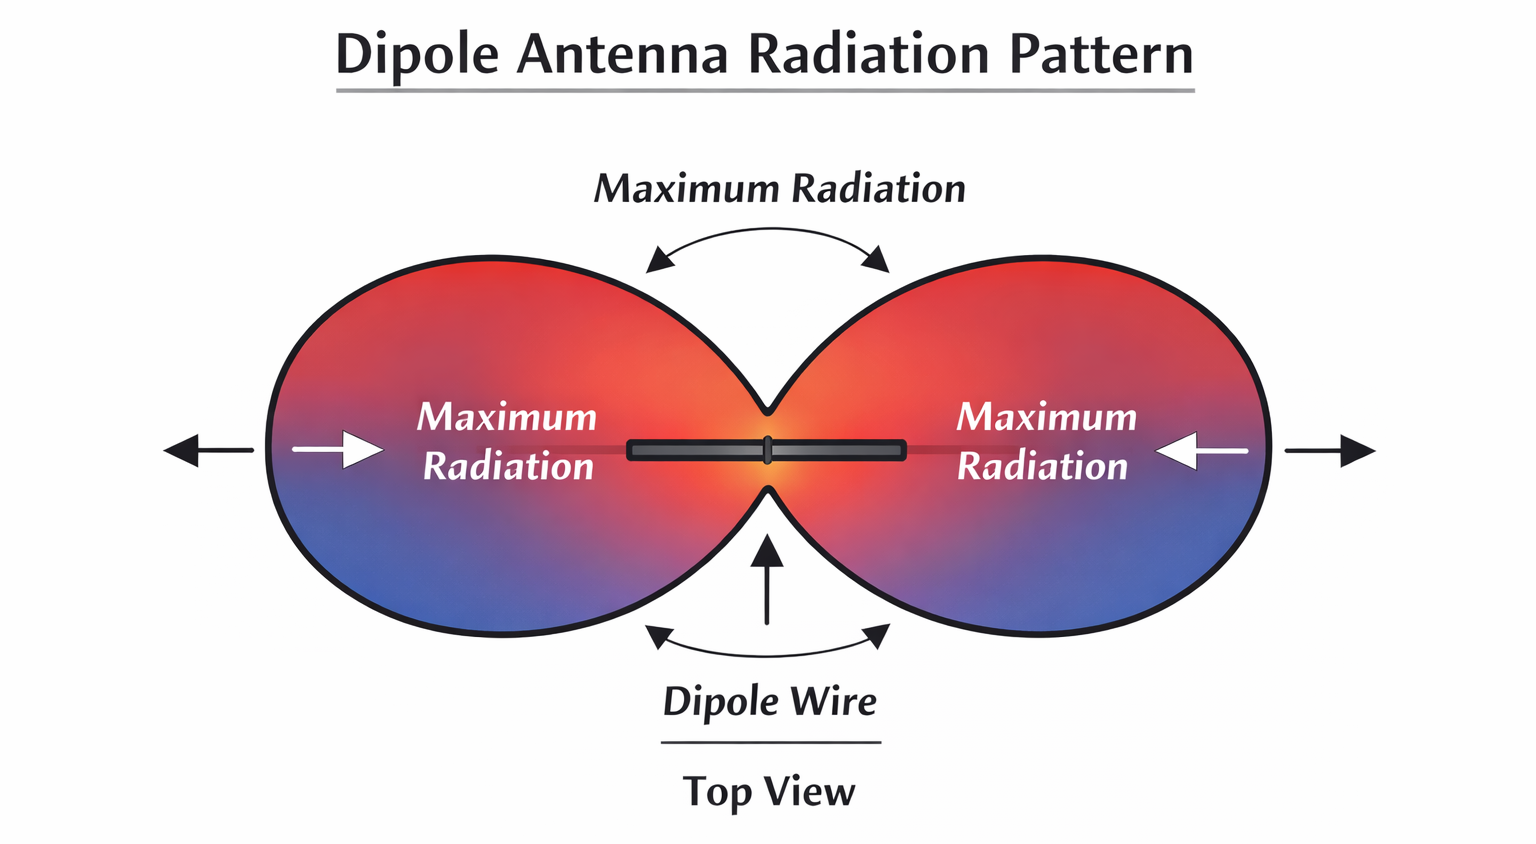
A horizontal dipole radiates strongest at right angles to the wire and weakest off the ends. This broadside radiation pattern can be used to aim signal strength toward desired coverage areas by orienting the antenna appropriately.
Understanding this pattern helps optimize communication range and direction.
Takeoff Angle and DX Performance
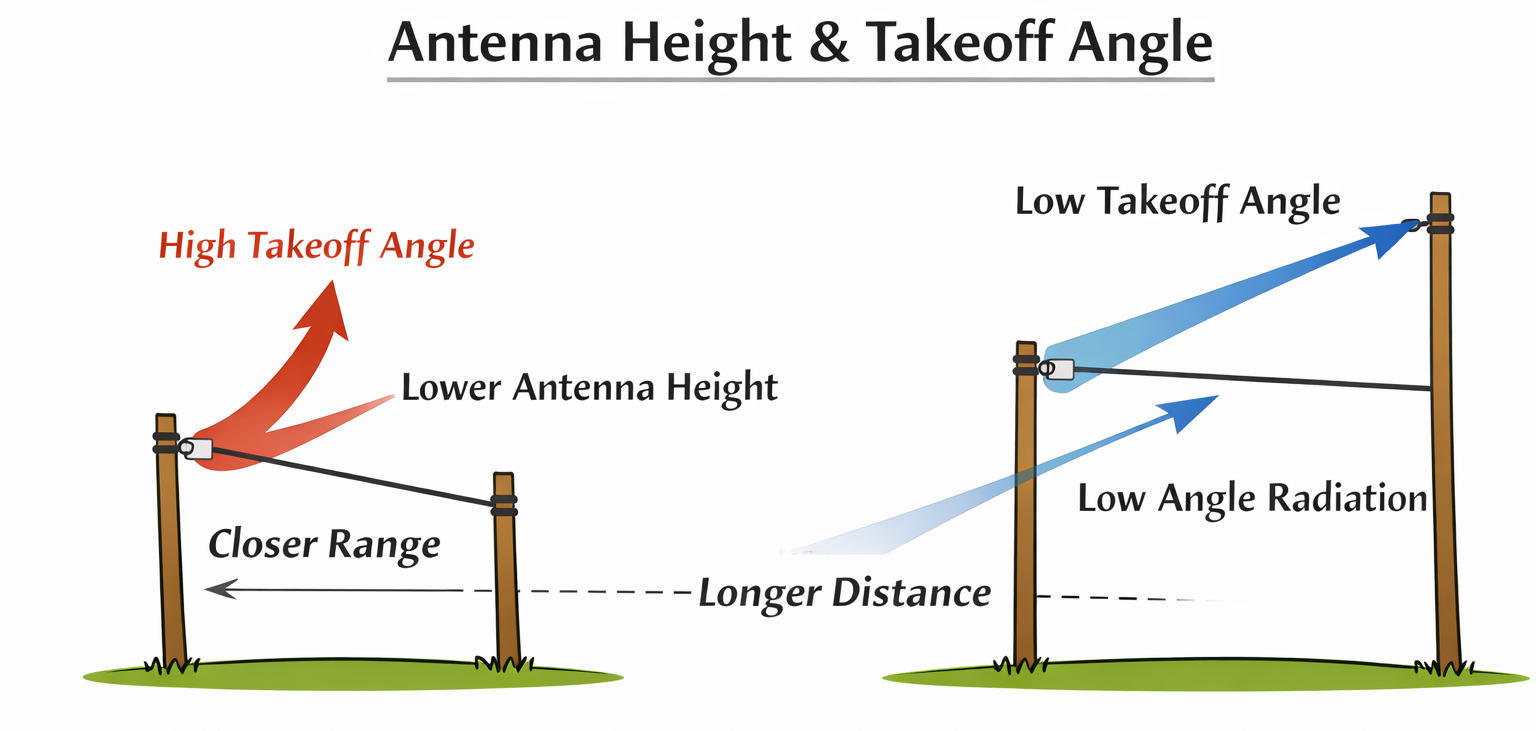
The takeoff angle is the angle at which RF energy leaves the antenna. Lower takeoff angles travel farther through the ionosphere and support long-distance contacts.
Higher takeoff angles return to earth sooner and favor regional communication.
Raising the antenna lowers the takeoff angle and improves DX potential.
Tips and Tricks for Better Performance
To get the most out of your 15 meter dipole antenna, consider these helpful tips and tricks. By using these techniques, you can make your 15 meter dipole work better. This will improve your ham radio experience.
- Use high-quality, stranded copper wire to minimize power losses and improve durability.
- Experiment with the height and angle of the antenna to find the optimal configuration for your location and needs.
- Incorporate a balun or common-mode choke to help reduce common-mode current and improve the antenna’s radiation pattern.
- Fine-tune the length of the wire elements to achieve the lowest SWR within the 15 meter band.
- Consider adding additional elements, such as a reflector or director, to create a more directional dipole antenna.
- Regularly inspect the antenna for any signs of wear or damage and make necessary repairs or adjustments.
By following these tips and tricks, you can make your 15 meter dipole work better. You’ll get improved ham radio antenna tuning and signal quality. Try different setups to see what works best for your needs and location.
| Technique | Benefits |
|---|---|
| Use high-quality, stranded copper wire | Minimize power losses and improve durability |
| Experiment with antenna height and angle | Find the optimal configuration for your location |
| Incorporate a balun or common-mode choke | Reduce common-mode current and improve radiation pattern |
| Fine-tune wire element length | Achieve the lowest SWR within the 15 meter band |
| Add reflector or director elements | Create a more directional dipole antenna |
| Regularly inspect and maintain the antenna | Identify and address any issues for optimal performance |
Common 15 Meter Dipole Building Mistakes
Many builders cut the antenna exactly to calculated length instead of leaving extra for tuning. Others install the antenna too low, reducing radiation efficiency.
Poor electrical connections at the feedpoint can raise SWR and cause signal loss. Skipping strain relief often leads to wire breakage over time.
Avoiding these mistakes improves performance and reliability.
Troubleshooting Common Issues
As a seasoned ham radio enthusiast, I’ve faced many challenges with the 15 meter dipole antenna. But, most 15 meter dipole troubleshooting issues can be fixed easily with some troubleshooting. Let’s look at common problems and how to solve them.
High SWR
A high standing wave ratio (SWR) means the antenna isn’t tuned right. Check the wire elements’ length first. Adjusting the length can lower the SWR. Also, make sure all connections are tight to fix dipole antenna issues.
Poor Radiation Pattern
A bad radiation pattern can come from the antenna’s height or angle. Ensure the dipole is at the right height and angle for the best coverage. Using a balun or choke can also improve ham radio antenna problems.
Intermittent Performance
If your 15 meter dipole antenna works only sometimes, check its condition. Look for damage like broken wires or loose connections and fix them.
Excessive Noise or Interference
Noise and interference are tough, but shielding the coaxial cable helps. Fixing common-mode current issues can also reduce 15 meter dipole troubleshooting problems.
Difficulty Tuning the Antenna
Tuning the 15 meter dipole antenna can be tricky. An antenna analyzer can give you precise readings, making it easier. Double-check your measurements and adjust slightly to solve dipole antenna issues.
Every antenna setup is different. The key to solving ham radio antenna problems is patience and a careful approach. By tackling these common issues, you’ll get your 15 meter dipole antenna working well.

Portable and Temporary Setups
The 15 meter dipole antenna is great for portable and temporary uses. It’s perfect for field work, emergency comms, or amateur radio on the go. You can use light materials like fiberglass or carbon fiber poles to support the wire elements.
A popular way to set up a 15 meter dipole is the inverted-V method. This lets you put up the antenna without extra masts. Or, you might prefer a straight dipole, which is simpler to set up in small areas.
For easy transport and quick setup, consider a self-supporting dipole. These are perfect for emergencies, field days, or any time you need a reliable antenna fast.
Choosing an inverted-V, straight dipole, or self-supporting design matters. The key is to pick high-quality, light materials that can handle outdoor use. With the right planning, your 15 meter dipole antenna will work well and be easy to move around.
15 Meter Dipole Build Summary
- Calculate total dipole length
- Cut elements slightly long
- Attach center feedpoint
- Install insulators and support lines
- Raise antenna to operating height
- Measure SWR and trim for resonance
- Secure and weatherproof connections
Resources and Further Reading About Building a 15 Meter Dipole
If you’re keen on learning more about Building a 15 meter dipole, there are many resources out there. You can find technical guides and online tools to help you. These resources are a great place to start.
“The Black Widow- A Portable 15 Meter Beam” by Allen Baker, KG4JJH, is a great article to check out. It’s from the May 2003 issue of QST Magazine. It talks about building a 15 meter Moxon-style antenna that can also be a dipole. The AC6LA Moxgen Calculator is another helpful tool. It’s an online tool that helps you figure out the size and performance of Moxon and dipole antennas at different frequencies.
There’s also “Building the 6 Meter Moxon Antenna” by JP-Antennas that you might find useful. It gives a framework that can be applied to the 15 meter band. Don’t forget to look at websites from antenna manufacturers and forums for enthusiasts. These places have lots of info and tutorials on designing and building dipole antennas. They can really help you learn and get inspired for your projects.
Frequently Asked Questions
How high should a 15 meter dipole be?
At least 30 feet is recommended, but higher improves DX performance.
Can I use a tuner instead of trimming the antenna?
Yes, but proper resonance improves efficiency.
Does wire thickness matter?
Thicker wire slightly widens bandwidth and improves durability.
Can I install it as an inverted-V?
Yes. This is common and reduces space requirements.
About the Author
Vince, W2KU, is a licensed Extra class amateur radio operator and the founder of Ham Shack Reviews. He was named Amateur of the Year in 2026 for contributions to practical amateur radio education and equipment evaluation.
He knows propagation very well, operates mobile and handhelds daily. Vince exchanges QSL cards for DXCC, contest confirmation, and award tracking and is the club QSL manager. His guidance focuses on practical operating procedures, accurate logging, and real-world amateur radio practices.